Tuesday, March 24, 2009

Cumin Lamb with Apricot and Tomato Chutney on Couscous


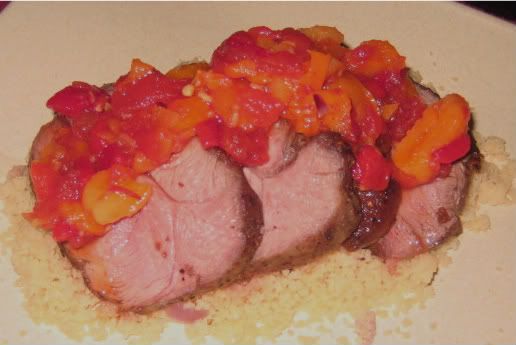
Hi All, This was a dish I had been imagining for quite some time, and I finally said, stuff it, I'm going to just throw it together and see what happens, and boy was I happy I did, zesty Moroccan spices on tender roasted lamb thigh, topped with sweet n sour tangy chutney, the couscous was a logical choice I figured and seemed to compliment the dish well, next time I'll probably incorporate a Herby type sauce to dress the plate, perhaps mint and basil, but I'm not sure how it will go with the chutney.

Anyway, I simply smashed up some whole peppercorns with about a teaspoon of cumin seed and a teaspoon of coriander seed with some sea salt and rubbed it into the lamb leg pieces (they come from the thigh, butchers sometimes call it a mini roast, if you have the $$$ get the back strap) and set aside while you make the chutney. I'll list the ingredients used;

4 medium ripe tomatoes (oven roasted until skins are dry and split, cool, de-seed and dice)
1 Red pepper (grill whole until all sides are blacked, set in a covered bowl for 10 minutes and peel away black sin and discard, de-seed ad dice)
half a cup of dried apricots (diced)
juice of one lemon
one cup of good apple cider
a splash of red wine vinegar
sugar to taste
about 3 cloves (or a half teaspoon of ground cloves)

Simply place all prepared ingredients into a pan and bring to the boil, reduce to a simmer for about 20 minutes, cover to prevent too much evaporation (you're not trying to boil off as much as you are trying to get the apricots to absorb the liquid and the vinegar and cider should almost liquefy the tomatoes into a sauce)

See the how to cook a steak section on my blog for directions on cooking the lamb and it is fairly similar, you need to sear all sides in a pan, them place in a baking tray to finish the roasting.

I strayed from the couscous packet instructions a bit and fried off some red onion and a clove of garlic in the pot before adding chicken stock and bringing to the boil, turned off the heat and added the couscous, left for 10, and stirred through some butter, YUM.

Seeing as I used cider in the chutney I figured it would be a nice accompaniment to the finished meat, turns out I was right, Some good Tasmanian Apple cider over ice in a big glass seemed to wash the meal down well, giving the hot dish an almost summertime feel!

Tuesday, March 10, 2009

Mexican Pulled Beef


No its not the name of a Latin late night massage parlour, this is my recipe for pulled beef, the type you might use to make burritos, as pictured, or nachos, or tacos.

I know its not as gourmet as some of the other pictures i like to flash around, but damned its nice to have a pot of this stuff in the fridge.

What i use;

about a kilo of topside beef, i get it in roast form, its cheaper and i cut it into steaks, always cutting across the grain and trim all fat.
two large onions
one Jalapeno and one large red chili
Coriander
4 cloves of garlic
Smoked paprika
Tomato paste

Cut the steaks up into manageable pieces and brown on both sides, season the meat also. remove from the pan and place in a pot with enough hot water to cover all the meat and then some more. Bring to the boil, then simmer. Place the Onions, garlic and chillies into the food processor and buzz until you have a nice puree, with a bit of olive oil, fry this off in a pan until it becomes fragrant and starts to brown, add this to the pot, I add some tomato paste here to give both colour and sweetness, about a tablespoon does the trick, then just simmer for about an hour or so or until the meat easily breaks apart, adding paprika and cayenne pepper as you go, depending on tastes, keep an eye on it so as to not dry up the water, topping up when necessary. To shred the beef, remove from the pot and place on a chopping board, using two forks opposing each other, use one to hold the piece of meat and use the other to tear shreds off it, return the shredded beef to the pot and add some kidney beans and or re-fried beans. Place in the oven to evaporate any residual moisture that might make it too sloppy. Then serve however you want!!

Thai style Fish Cakes


Having speared an Aussie Salmon, these fish aren't really renowned for their eating qualities, mainly because they can be a bit plain and the flesh can dry out. That being said, the flesh is also very white with big chunky flakes, perfect for fish cakes.

What you'll need;

about 600g of cleaned fish flesh
3 cloves of garlic
thumb of ginger (peeled/sliced)
2 eggs
one whole red chili (depending on taste)
Bunch of coriander (add as much or as little as you like)
rind and juice if one lime
3 sliced shallots
splash of fish sauce
one small potato
bread crumbs
flour

vegetable oil and a bit of sesame oil

Before you do anything, peel and dice your small potato, put in a microwave safe bowl with some hot water, into the microwave for 5 minutes or until tender.

Clean up the fillet, removing any bones, and any red/blooded meat, and dice into 3cm chunks, pulse in your food processor so as to mince, being very careful not to puree, put the fish mince into a large mixing bowl. Into food processor put the eggs, garlic, ginger, chili, shallot, coriander, lime rind/juice and fish sauce, blend on high until all is well mixed/blended. Add the drained potato and process quickly to combine. Add mixture to the fish and mix well with a spoon, add breadcrumbs if mixture is too wet, you want it to be a manageable texture so you can roll patties with your hands and they stay together then dust them in a plate of flour. Lay out all of your patties on a plate, and let them rest for about 10 minutes before shallow frying in vegetable oil with a bit of sesame oil for extra flavour. Fry until golden brown. Serve with a choice of condiments, sweet chili, sweet and sour etc. Great for when you have mates coming round for arvo beers, they are also equally nice cold, right out of the fridge, for something to much on when you stumble in the door at the small hours of the morning!

Filleting Fish


This here is a Tailor i speared. I wanted to do something for the blog and decided that he'd make a perfect specimen for a filleting guide as most fish share the same bone structure and shape as Tailor and the guide can than be applied to most fish.

Firstly, i start with a sturdy bench and I use a dedicated chopping board for cleaning fish. I generally bleed all fish on capture and remove the gills, this is of course after a quick spike to the brain once I have the fish in my hands, this dispatches the fish quickly and ensures the struggle is over humanely, not only an ethical decision, but one that preserves the eating qualities of the fish, and excessive struggle causes build ups of lactic acid in the flesh and can taint the meat.

Another important factor here is your filleting knife, I like a flexible blade around 30cm long (handle/tang included), and you want the edge to be razor sharp, this will not only make the job much easier but much safer, a sharp knife ensures easy strokes and no dangerous forcing of the blade.

The first cuts I make on the fish are shown below in picture #2, I slice deep into the spine behind the head, then run the tip of the knife along the underside of the dorsal fin, just breaking the skin, all the way back to the tail, from the top of the initial cut. Do this on both sides first as it will make this a lot easier when the fish is all together.


The second cuts are where it will take a bit of practice to hone your skill, in picture #3, I've started bringing the fillet back off the vertical bones of the fish, to do this, peel back the skin from your second cut, and using the middle of the knife blade, slice by gently edging along the frame of the fish, using the vertical bones as your guide, gently pull at the fillet as you slice further down towards the spine, once you reach the spine, run the knife point back along the spine towards the head, breaking the little horizontal bones above the gut cavity at the spine, then using the flex of the knife to shave the belly flaps of the fillet off the rib cage like I have done in picture #3. Slice though the skin under the belly, then holding the fillet, use the flex of the knife again to remove the remainder of the fillet from the tail.


As you see here I have two lovely fillets, but the skin is still on. give the board a wash, and dry it off, sprinkle some table salt for grip, and re-sharpen your knife, place the fillet skin side down with the tail end to the left (I'm right handed), using you first two fingers, hold the skin and fillet as far back as possible, pushing down hard (like in the next picture), your first cut will be just in front of your fingers but gently so as to not break the skin of the fillet, angle the blade so as to bring the knife flat with the board with the sharp edge of the blade facing away from your fingers, and run the knife a few cm away from your hand (like in the next picture), separating the skin from the fillet, adjust your grip, you should now have enough skin to pinch and hold tight. The trick here (that takes some practice) is to learn to pull the skin while holding the knife still, flat to the board, with an ever so slight angle of the blade so as to peel the flesh from the skin as you pull the skin away from the knife. This is a skill that does take some honing and the more fish you skin, the better you become (obviously, derrr).


Then its just a matter of tidying up your fillet, slice of any dags and or red/bloody meat, and locate the bones in the middle of the widest part of the fillet, find the back one and cut a skinny 'V' from the fillet, in an effort to collect all the bones.

The final rule is to always clean the fillet in a salt brine solution, make up a bowl of salty water, keep adding salt to the water until it tastes like the ocean. NEVER use fresh waster of salt water fish, it will dry out the meat.


Done, practice it, you've learnt a skill you'll keep for your lifetime.

Tuesday, March 3, 2009

Fettuccine with Chorizo and spicy cherry Tomato


Another quick, simple and tasty pasta dish, and a regular for me.

Once again, prepare the ingredients before you start to cook. I normally start boiling my pasta water whilst preparing.

Raw Chorizo sausage (half a sausage per person, sliced)
Fettuccine (i go about one loose handful per person)
one small handfull of cherry/grape tomato per person
one clove of garlic (smashed and minced over salt)
one large shallot (finely sliced)
one small red chili (De-seeded and finely sliced)
red wine vinegar
white wine
fresh cracked black pepper

Once the water is boiling, add your pasta, add oil to your fry pan cold (I have of late also been adding my ingredients cold, and letting the temp come up, i find it infuses the oil flavour with the foods better), turn on the heat and add all ingredients except the liquids. Toss the pan regularly and once the skins of the tomato's have split, add a good splash of the vinegar and about half a cup of wine. Let it boil off adding about a 1/3 of a cup of the boiling cloudy pasta water, this aids as a thickener and will make your sauce. Once adequately reduced, turn off the fry pan and wait for the pasta to be ready. Drain pasta and add to the fry pan, toss to coat all the pasta, serve with some Parmesan and some sharp cold wine, sav blanc or a crisp rose.

I have done this with variations such as prawns instead of sausage, and with angel hair pasta, it was divine.