Tuesday, November 24, 2009

Kingfish with Avocado salsa on Sweet Potato Rosti


Whenever anyone asks me what they should do with a piece of fish, I generally say, "cook it", or in the case of some fish, especially kingsfish, the answer might be "keep some cool, raw, thinly sliced, and dip in soy and wasabi", anyway, the rule here that I have learnt to follow with fresh seafood is to preserve the flavour of the fish, and I find the best method is to cook the fish on its own and serve accompaniments that compliment the fish's flavour.

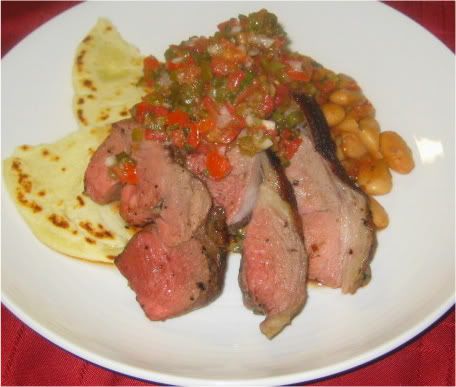
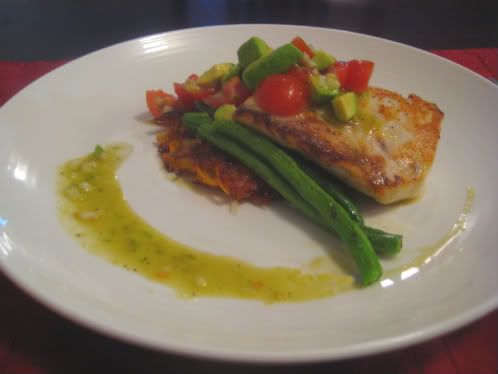
This is probably one of my favourite ways to eat kingfish or any other gamey type fish and I like to think of it as being a fancy "fish and chips with lemon" as it still embodies all those characters.

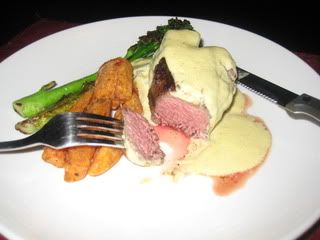
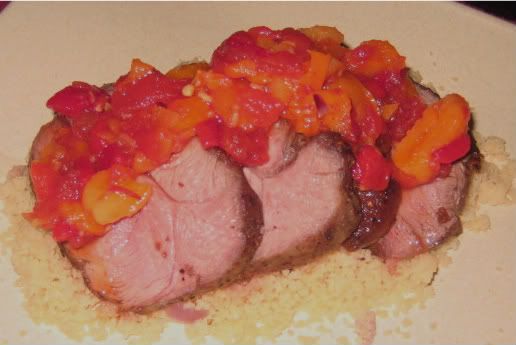
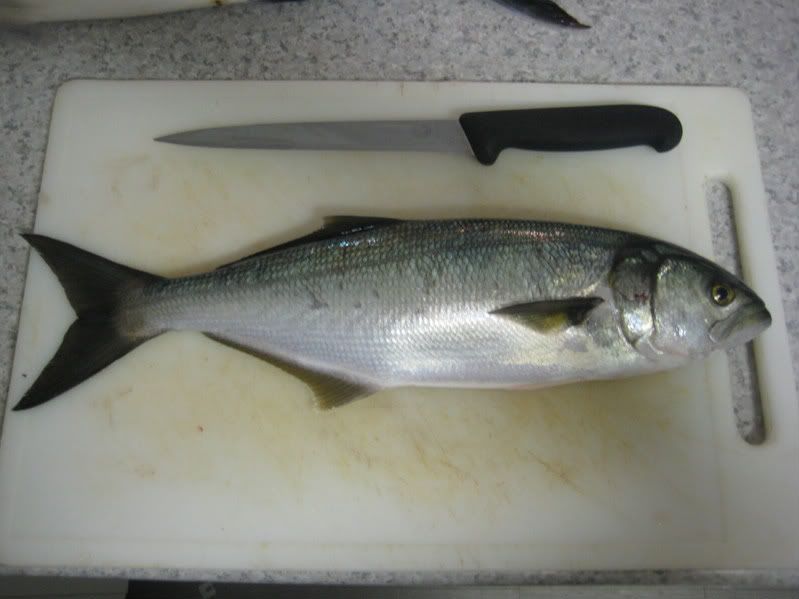
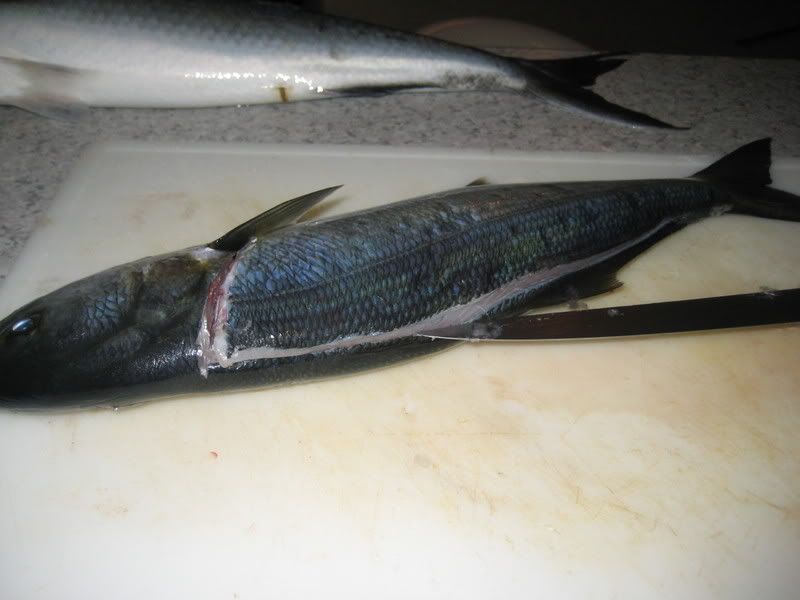
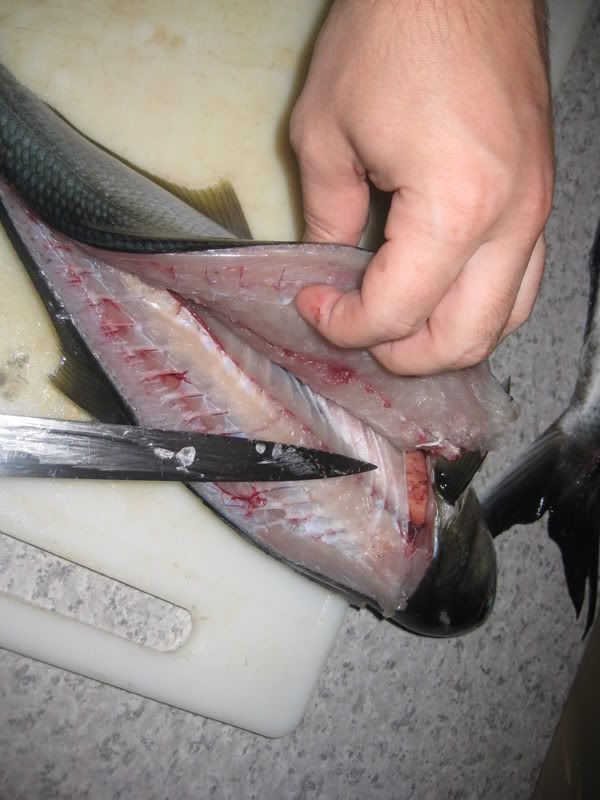
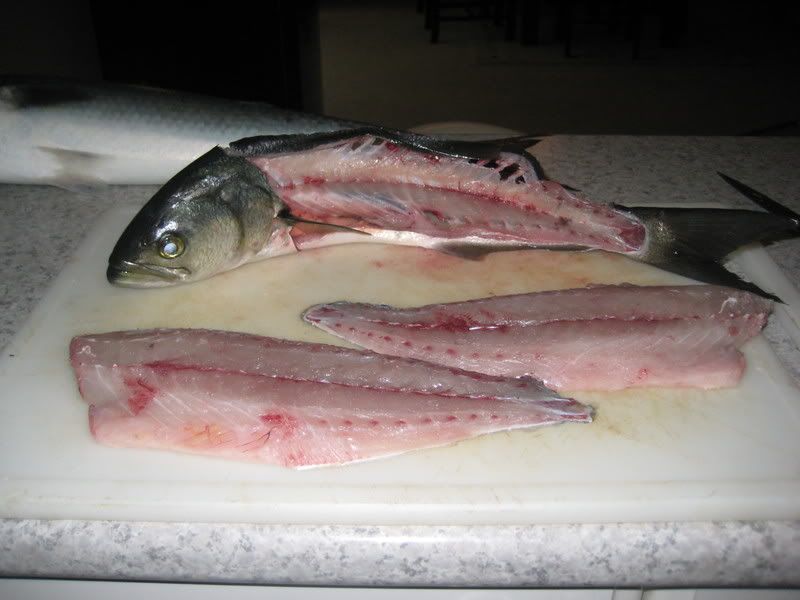
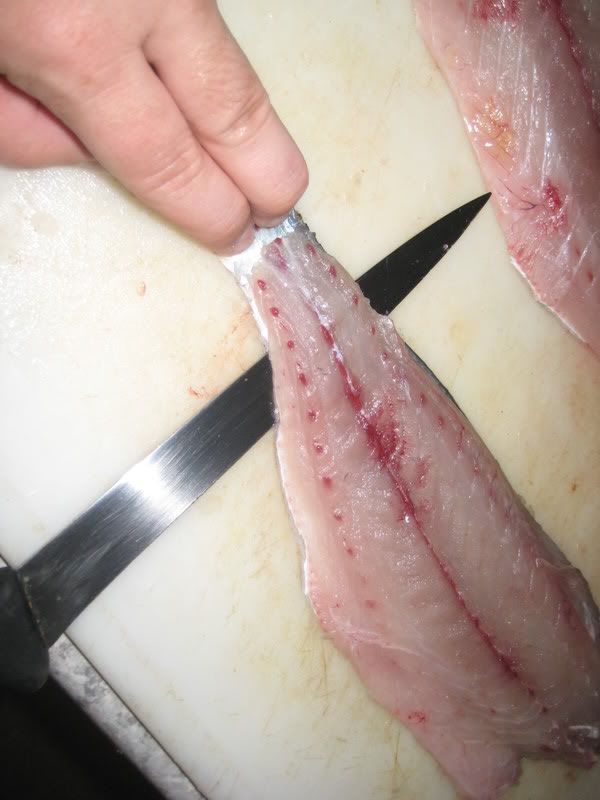
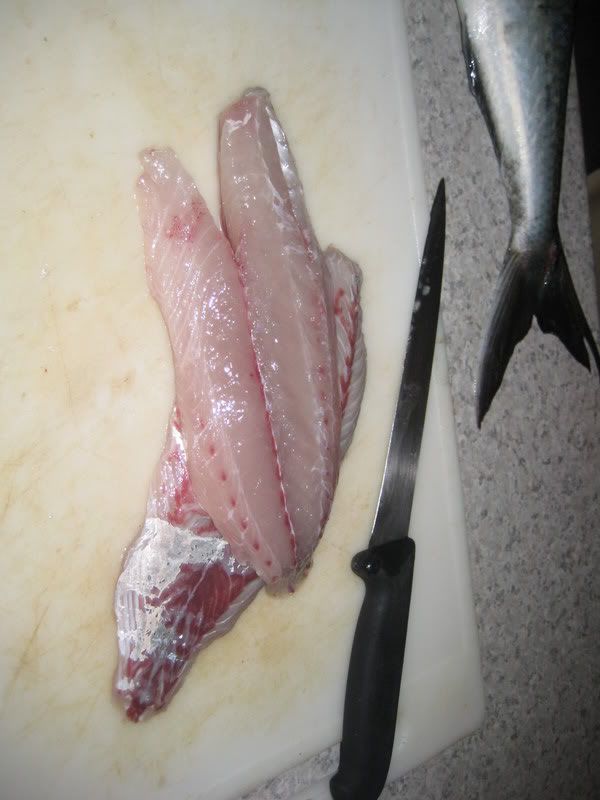
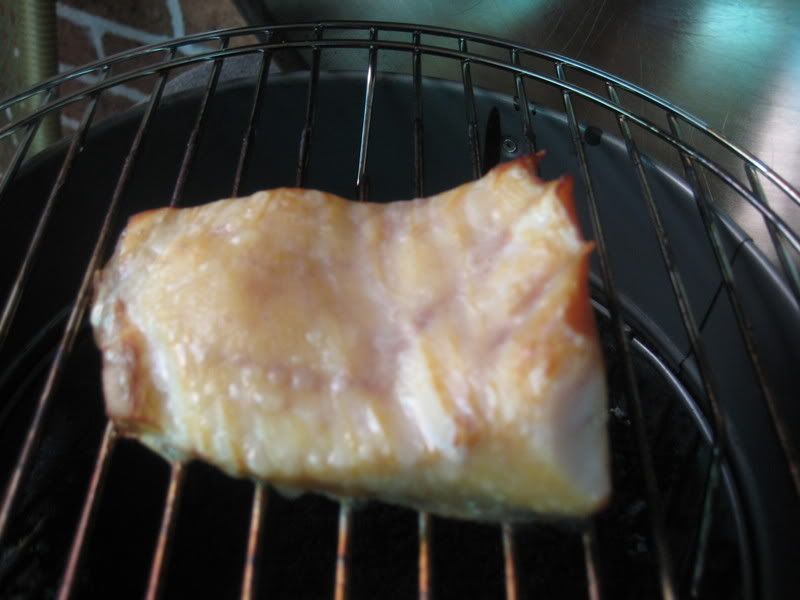
For the fish, when filleting I portion the fillet into single serves, removing any red/blood, and keep the steaks nice and thick, this allows you to keep them nice and juicy. Using a hot pan, a bit of olive oil, season the fish, and sear on one side until you see the white start to travel up the side of the fillet, then turn, remove from the heat once there is just a little bit of opaque in the middle of the fillet and place in a warm dish and put aside in a warm oven, the residual heat from the fish will continue to gently cook it through, leaving it really juicy inside.

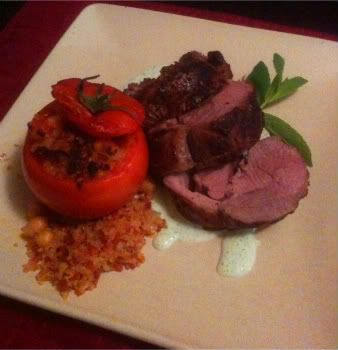
For the Rosti, grate one potato(I like golden delight as they give a delicious crunch) to one equally sized sweet potato, half a diced spring onion, one egg (perhaps two depending of how much you make or how wet/dry the mixture is) season well and combine, using your hands, put hand fulls into a pan covered in canola oil or veg oil and fry until golden on both sides, place in the oven paper towels and some extra salt to both absorb the oil and to continue cooking them inside.

Now for the salsa, this is so simple its not funny, finely dice the other half of your spring onion, a handful of grape tomato's, half an avocado. The zest of a lime and the juice from half of it, salt and pepper and a good lug of olive oil so it's nice and wet, put aside so the avocado and lime 'flavours' the oil, this will make for a delicious zesty drizzle for the plate.

Its that simple and best of all showcases the individual flavours of your ingredients.

Wednesday, November 18, 2009

Meat and two Veg with Bernaise sauce


This was a lunch a couple of weeks back that I thought would be a great way to show off just how easy a splash of Bearnaise sauce is to make. Be warned though, do not let your guest watch as the amount of butter used will scare them back to their personal trainers.

I used piece of eye fillet and cooked it as per usual (see steak section) accompanied with some brocollini, pan seared then removed from the heat and covered to allow it to steam through and some sweet potato wedges (recipe coming as they are a whole other[tasty] beast).

So, for the Bearnaise, I know this scares some people (cause it used to scare me) but i have devised an almost foolproof method.

you will need, for four people;

one egg yolk
half a stick of butter (bout 180 grams and don't even think of using margarine)
tablespoon of dried or fresh tarragon(the heart of Bearnaise)
Minced- one clove of garlic and one white section of shallot
about half a cup of white wine vinegar
two tablespoons of hot water
salt and pepper to taste

In a pot, add the Vinegar, tarragon, garlic/shallot, reduce by two thirds, pour into a glass bowl, now you want your glass bowl to fin neatly into the top of the pot to act as a double boiler, fill enough water into the pot so that it is touching and well covering the bottom of the bowl, bring the water to the boil and turn the heat off.

put your butter into a pan and heat it until it foams and is liquefied, remove from heat.

Put the bowl with the vinegar reduction on the pot with the water so the water in the pot starts heating the glass bowl, add your egg yolk and using a stick blender on low, whizz the mixture, while you are doing this, in one slow continuous dribble, pour the melted butter into the whizzing mixture, it will begin to emulsify, and the amount of butter is proportional to the level of thickness with not much butter being thin. If your sauce doesn't seem thick enough, melt more butter in the microwave and continue pouring. Once desired consistency is achieved, serve immediately.

whilst it sounds like a complex procedure, it really is easy to do while your meat is resting in the oven and takes all of about five minutes.

Jamie's "Epic Churro Lamb" from "Jamie's America"


I was recently given a copy of "Jamie's America", having watched a couple of the episodes on TV, i was stoked to receive this gift as it also represented the passion for food that i obviously reflect on others, so i was pretty chuffed.

The book is awesome, Jamie Oliver has his critics, but i cant fault him in this instance and readers of my blog will know that i am quite a fan, so take my praise with a grain of salt (and some cracked black pepper).

Apart from the wonderful flavours that Jamie describes and imagines, I think it is also his food fundamentals and strict principals that is the main appeal to me. He manages to display a great respect for all the produce he uses and this is regimented in the book by asserting the importance of using the best quality animals, as this is a direct reflection on the treatment of the Pig, Cow or Chicken during its farming stages. Also the manner in which he articulates his love of fresh unpackaged ingredients is instantly absorbed by the reader and encourages the budding home cook to venture out and source the best freshest and healthiest options.

In a time where there are so many different weight loss diets, nothing is as important as providing your body with a wide range of fresh un-adulterated produce. Jamie has the gift of engaging his readers to garner as much enjoyment from hunting out and gathering the best ingredients, as actually cooking and eating it. And I believe this to be the heart and soul of good cooking.

So, to the food, i took one look at some of the Navajo Churro lamb recipes and had to do this.

The lamb was dripping with the flavours of the marinade and the fat is instantly cut through by the sharp zangy salsa of jalapenos and oven roasted bulls horn peppers. I served it up with a side of butter beans that I fried in some fresh cut tomato, red wine vinegar and the juices from the lamb, let the beans tenderise in the oven with the lamb resting on top, as suggested in the book, i accompanied it with some Navajo flatbreads which like a piece of Naan, mopped up the plate pretty damned well.

If you are of the thinking that American food is big, fatty and sugar coated, then you are surely wrong, the massive diversity of the landscape allows for a huge range of different takes on classic peasant ingredients, which is my favourite manner of cooking. Enjoy.

PS. Thanks Jamie.

Wednesday, August 5, 2009

Spiced Lamb Rump on Mint Yoghurt Sauce with a Chorizo and Quinoa stuffed Tomato


All I can say is that I was pretty chuffed with this little idea of mine, juicy cumin flavoured lamb with the cool mint sauce followed up with the surprisingly tender tomato flesh with savoury chorizo stuffing, the Quinoa (http://en.wikipedia.org/wiki/Quinoa)which is a super food on its own with numerous nutritional benefits has a light fluffy texture with a nutty flavour and was a perfect accompaniment.

As usual, these are just ideas thrown together on a plate, so I'll run through the bits a pieces and you can use it for your own wacky plans.

For the lamb rump, I trimmed all the suet, even if t meant doing some deep tissue surgery and made a rub of oven toasted cumin seed, coriander seed, black peppercorns and some salt. Grind it into a powder and rub it over the meat, roll the rump and tie it up. Brown in a fry pan on all sides and place in the oven on a baking tray at about 150 (there's some sinew that needs to be broken down) until nice and pink.

For the stuffing, mince one chorizo and add to a pan with a diced shallot, one minced garlic clove, about half a cup of chickpeas (cooked) and half a cup of cooked quinoa (cooked as per packet directions), fry off until chorizo is cooked and all moisture has been absorbed, add pepper to taste and juice of half a lemon. Spoon into gutted tomatoes and place in the oven with the lamb. When you bring the lamb out to rest, fire the oven up to get some colour on the tomatoes.

Mint sauce is the easiest, I put a garlic clove with skin on in the oven with the lamb on the tray, when its coloured and soft, remove it and peel of the skin, chop and place in a bowl with a handful of torn mint leaves, 3 or so tablespoons of natural yoghurt some pepper, and whiz it up with a stick blender. Yum.

So that's it, experiment and have fun. Stuffed anything is sure to impress guests and it makes a great side to serve up on a platter at a BBQ.

Monday, July 13, 2009

Rabbit Ragu with Thyme and Fettuccine


I love winter cooking, where you put a bunch of fresh ingredients into a big ol' pot, cover it with stock, wine and herbs and simmer for hours. The smell alone warms the house and comforts those within.

A friend of mine brought me home some rabbit from a hunting trip and I wanted to feed many with one bunny, Ragu it is. After tasting probably the best ragu I've tried at Pendolino at the Strand in Sydney last weekend, I based my recipe on that.

1 White rabbit, portioned
1L veg stock (use beef if you want but i wanted the rabbit to shine)
1 Leek (diced)
2 Cloves Garlic (smashed over salt, diced)
1 Cup white wine
1 Good handful of fresh thyme (Pendolinos ragu used Marjoram but i decided on thyme for rabbit)
2 sticks of celery (diced)
2 carrots (diced)
flour and pepper for dusting of rabbit portions
Bay leaves
Olive oil
Butter

Lightly dust your rabbit segments in some flour and pepper ( i add any salt at the end as rabbit is salty enough so as to avoid it being to salty) and Brown in oil and butter in a thick bottomed Pot, once browned, remove from the pot and put aside, add the celery, leek and garlic, sweat in the butter and oil until translucent, deglaze with the white wine, simmer for a minute or two then return the rabbit and any juices, cover with stock, tie your bunch of thyme up with some twine and dangle into the pot like a teabag so you can remove it later add around 4 bay leaves and simmer for an hour and a half or until the meat falls from the bones, add more water if necessary. Once the meat is falling off the bones, remove the rabbit pieces and place on a chopping board, remove the bay leaves and thyme and put aside, using a bar mix, pulse the liquid in the pot until mildly consistent but not a puree', using forks, shred all meat from the rabbit bones and return to the broth, discard the bones. Simmer with the carrots, bay and thyme for a further 30 minutes, adding more water if it gets too thick as it might start to stick. Cook your pasta but time it well, you want your sauce to thicken to its optimal point as the pasta is finished, remember also that the sauce will thicken as you add the pasta. Once combined stir the sauce through the pasta with a tablespoon of butter, serve garnished with fresh thyme leaves and pecorino, or your favourite sharp Italian cheese.

Enjoy

Monday, June 15, 2009

Seared Stuffed Cuttlefish with Chorizo and Chickpea salad


I bagged a medium sized cuttlefish yesterday whilst freezing my butt off all day in a spearfishing competition. All was not lost however as I'd picked up a tasty delight for tonight's dinner.

Again, I wont go into all the detail, as I'd be here for ever. I will go through however the essentials for all the bits and pieces, I stole little bits from here and there when googling for ideas of what I wanted.

Once your Cuttlefish is cleaned and you have a big slab of meat, cut it into big rectangles so you can roll up the stuffing and shove some skewers through it to hold it all together. I scored the outside in a diamond pattern to help get the flavour through it and I also marinate in kiwi fruit first for about an hour as this really helps marinate the flesh, so the scores allow for kiwi juice to get right in there. The rectangles for this were about 10cm X 25cm.

For the stuffing, I nicked a bit from master chef and whizzed up some sour dough bread for crumbs and diced up all the off cuts (also tenderised) from the cuttlefish, two shallots, one garlic clove and three anchovy fillets (even if you think you don't like em, put them in, they lend such an important part of the flavour) fry this off in a good helping of olive oil until the cuttle goes opaque and put in a mixing bowl, oil and all. Add the rind of one lemon and the juice of half it, a handful of chopped parsley, mix and season to taste, should be tangy with a good seafood flavour from the anchovy and cuttle.

Lay the cuttle out flat with scored side down and place a few heaped tablespoons of stuffing inside, then roll it and prop it like a barrel, put one skewer in the bottom and keep spooning mixture in the top, gently push down to make sure its all firm but don't over stuff, put one more skewer to hold it in place and leave to sit for a bit.

The salad was easy, chop up the chorizo, fry it off in some olive oil (again, a good helping) and when they start to go golden add the chick peas to get some heat through them and turn the heat off, using a slotted spoon, strain out the chorizo and chick peas leaving the oil in the pan and into a mixing bowl, add a handful of chopped coriander, juice of the other half of the lemon, some diced oven roasted capsicum and couscous. Season to taste. And add a dollop of natural plain yoghurt to serve.

Sear all sides of the cuttlefish in the red chorizo oil, this is a bit of an art as you have to move the skewers from side to side to get access to all sides, i didn't really think about it very long so if you figure a better way lemme know, i was going to use kitchen twine but didn't know how that would go in the fry pan. You want heat through the whole thing but just golden on all sides so adjust your heat accordingly.

That's it really, dress with some of the red chorizo oil and enjoy!!

Tuesday, March 24, 2009

Cumin Lamb with Apricot and Tomato Chutney on Couscous


Hi All, This was a dish I had been imagining for quite some time, and I finally said, stuff it, I'm going to just throw it together and see what happens, and boy was I happy I did, zesty Moroccan spices on tender roasted lamb thigh, topped with sweet n sour tangy chutney, the couscous was a logical choice I figured and seemed to compliment the dish well, next time I'll probably incorporate a Herby type sauce to dress the plate, perhaps mint and basil, but I'm not sure how it will go with the chutney.

Anyway, I simply smashed up some whole peppercorns with about a teaspoon of cumin seed and a teaspoon of coriander seed with some sea salt and rubbed it into the lamb leg pieces (they come from the thigh, butchers sometimes call it a mini roast, if you have the $$$ get the back strap) and set aside while you make the chutney. I'll list the ingredients used;

4 medium ripe tomatoes (oven roasted until skins are dry and split, cool, de-seed and dice)
1 Red pepper (grill whole until all sides are blacked, set in a covered bowl for 10 minutes and peel away black sin and discard, de-seed ad dice)
half a cup of dried apricots (diced)
juice of one lemon
one cup of good apple cider
a splash of red wine vinegar
sugar to taste
about 3 cloves (or a half teaspoon of ground cloves)

Simply place all prepared ingredients into a pan and bring to the boil, reduce to a simmer for about 20 minutes, cover to prevent too much evaporation (you're not trying to boil off as much as you are trying to get the apricots to absorb the liquid and the vinegar and cider should almost liquefy the tomatoes into a sauce)

See the how to cook a steak section on my blog for directions on cooking the lamb and it is fairly similar, you need to sear all sides in a pan, them place in a baking tray to finish the roasting.

I strayed from the couscous packet instructions a bit and fried off some red onion and a clove of garlic in the pot before adding chicken stock and bringing to the boil, turned off the heat and added the couscous, left for 10, and stirred through some butter, YUM.

Seeing as I used cider in the chutney I figured it would be a nice accompaniment to the finished meat, turns out I was right, Some good Tasmanian Apple cider over ice in a big glass seemed to wash the meal down well, giving the hot dish an almost summertime feel!

Tuesday, March 10, 2009

Mexican Pulled Beef


No its not the name of a Latin late night massage parlour, this is my recipe for pulled beef, the type you might use to make burritos, as pictured, or nachos, or tacos.

I know its not as gourmet as some of the other pictures i like to flash around, but damned its nice to have a pot of this stuff in the fridge.

What i use;

about a kilo of topside beef, i get it in roast form, its cheaper and i cut it into steaks, always cutting across the grain and trim all fat.
two large onions
one Jalapeno and one large red chili
Coriander
4 cloves of garlic
Smoked paprika
Tomato paste

Cut the steaks up into manageable pieces and brown on both sides, season the meat also. remove from the pan and place in a pot with enough hot water to cover all the meat and then some more. Bring to the boil, then simmer. Place the Onions, garlic and chillies into the food processor and buzz until you have a nice puree, with a bit of olive oil, fry this off in a pan until it becomes fragrant and starts to brown, add this to the pot, I add some tomato paste here to give both colour and sweetness, about a tablespoon does the trick, then just simmer for about an hour or so or until the meat easily breaks apart, adding paprika and cayenne pepper as you go, depending on tastes, keep an eye on it so as to not dry up the water, topping up when necessary. To shred the beef, remove from the pot and place on a chopping board, using two forks opposing each other, use one to hold the piece of meat and use the other to tear shreds off it, return the shredded beef to the pot and add some kidney beans and or re-fried beans. Place in the oven to evaporate any residual moisture that might make it too sloppy. Then serve however you want!!

Thai style Fish Cakes


Having speared an Aussie Salmon, these fish aren't really renowned for their eating qualities, mainly because they can be a bit plain and the flesh can dry out. That being said, the flesh is also very white with big chunky flakes, perfect for fish cakes.

What you'll need;

about 600g of cleaned fish flesh
3 cloves of garlic
thumb of ginger (peeled/sliced)
2 eggs
one whole red chili (depending on taste)
Bunch of coriander (add as much or as little as you like)
rind and juice if one lime
3 sliced shallots
splash of fish sauce
one small potato
bread crumbs
flour

vegetable oil and a bit of sesame oil

Before you do anything, peel and dice your small potato, put in a microwave safe bowl with some hot water, into the microwave for 5 minutes or until tender.

Clean up the fillet, removing any bones, and any red/blooded meat, and dice into 3cm chunks, pulse in your food processor so as to mince, being very careful not to puree, put the fish mince into a large mixing bowl. Into food processor put the eggs, garlic, ginger, chili, shallot, coriander, lime rind/juice and fish sauce, blend on high until all is well mixed/blended. Add the drained potato and process quickly to combine. Add mixture to the fish and mix well with a spoon, add breadcrumbs if mixture is too wet, you want it to be a manageable texture so you can roll patties with your hands and they stay together then dust them in a plate of flour. Lay out all of your patties on a plate, and let them rest for about 10 minutes before shallow frying in vegetable oil with a bit of sesame oil for extra flavour. Fry until golden brown. Serve with a choice of condiments, sweet chili, sweet and sour etc. Great for when you have mates coming round for arvo beers, they are also equally nice cold, right out of the fridge, for something to much on when you stumble in the door at the small hours of the morning!

Filleting Fish


This here is a Tailor i speared. I wanted to do something for the blog and decided that he'd make a perfect specimen for a filleting guide as most fish share the same bone structure and shape as Tailor and the guide can than be applied to most fish.

Firstly, i start with a sturdy bench and I use a dedicated chopping board for cleaning fish. I generally bleed all fish on capture and remove the gills, this is of course after a quick spike to the brain once I have the fish in my hands, this dispatches the fish quickly and ensures the struggle is over humanely, not only an ethical decision, but one that preserves the eating qualities of the fish, and excessive struggle causes build ups of lactic acid in the flesh and can taint the meat.

Another important factor here is your filleting knife, I like a flexible blade around 30cm long (handle/tang included), and you want the edge to be razor sharp, this will not only make the job much easier but much safer, a sharp knife ensures easy strokes and no dangerous forcing of the blade.

The first cuts I make on the fish are shown below in picture #2, I slice deep into the spine behind the head, then run the tip of the knife along the underside of the dorsal fin, just breaking the skin, all the way back to the tail, from the top of the initial cut. Do this on both sides first as it will make this a lot easier when the fish is all together.


The second cuts are where it will take a bit of practice to hone your skill, in picture #3, I've started bringing the fillet back off the vertical bones of the fish, to do this, peel back the skin from your second cut, and using the middle of the knife blade, slice by gently edging along the frame of the fish, using the vertical bones as your guide, gently pull at the fillet as you slice further down towards the spine, once you reach the spine, run the knife point back along the spine towards the head, breaking the little horizontal bones above the gut cavity at the spine, then using the flex of the knife to shave the belly flaps of the fillet off the rib cage like I have done in picture #3. Slice though the skin under the belly, then holding the fillet, use the flex of the knife again to remove the remainder of the fillet from the tail.


As you see here I have two lovely fillets, but the skin is still on. give the board a wash, and dry it off, sprinkle some table salt for grip, and re-sharpen your knife, place the fillet skin side down with the tail end to the left (I'm right handed), using you first two fingers, hold the skin and fillet as far back as possible, pushing down hard (like in the next picture), your first cut will be just in front of your fingers but gently so as to not break the skin of the fillet, angle the blade so as to bring the knife flat with the board with the sharp edge of the blade facing away from your fingers, and run the knife a few cm away from your hand (like in the next picture), separating the skin from the fillet, adjust your grip, you should now have enough skin to pinch and hold tight. The trick here (that takes some practice) is to learn to pull the skin while holding the knife still, flat to the board, with an ever so slight angle of the blade so as to peel the flesh from the skin as you pull the skin away from the knife. This is a skill that does take some honing and the more fish you skin, the better you become (obviously, derrr).


Then its just a matter of tidying up your fillet, slice of any dags and or red/bloody meat, and locate the bones in the middle of the widest part of the fillet, find the back one and cut a skinny 'V' from the fillet, in an effort to collect all the bones.

The final rule is to always clean the fillet in a salt brine solution, make up a bowl of salty water, keep adding salt to the water until it tastes like the ocean. NEVER use fresh waster of salt water fish, it will dry out the meat.


Done, practice it, you've learnt a skill you'll keep for your lifetime.

Tuesday, March 3, 2009

Fettuccine with Chorizo and spicy cherry Tomato


Another quick, simple and tasty pasta dish, and a regular for me.

Once again, prepare the ingredients before you start to cook. I normally start boiling my pasta water whilst preparing.

Raw Chorizo sausage (half a sausage per person, sliced)
Fettuccine (i go about one loose handful per person)
one small handfull of cherry/grape tomato per person
one clove of garlic (smashed and minced over salt)
one large shallot (finely sliced)
one small red chili (De-seeded and finely sliced)
red wine vinegar
white wine
fresh cracked black pepper

Once the water is boiling, add your pasta, add oil to your fry pan cold (I have of late also been adding my ingredients cold, and letting the temp come up, i find it infuses the oil flavour with the foods better), turn on the heat and add all ingredients except the liquids. Toss the pan regularly and once the skins of the tomato's have split, add a good splash of the vinegar and about half a cup of wine. Let it boil off adding about a 1/3 of a cup of the boiling cloudy pasta water, this aids as a thickener and will make your sauce. Once adequately reduced, turn off the fry pan and wait for the pasta to be ready. Drain pasta and add to the fry pan, toss to coat all the pasta, serve with some Parmesan and some sharp cold wine, sav blanc or a crisp rose.

I have done this with variations such as prawns instead of sausage, and with angel hair pasta, it was divine.

Monday, February 23, 2009

Eye fillet of beef with mushroom mascarpone and red wine reduction


What I wanted to do here was show people how easy it is to make restaurant quality steak at home.

I stole the idea for the mascarpone and mushrooms from a restaurant I visited in Sylvania, Sydney, called Kalevu, it was delicious and a great contempary way of dressing a steak. All I did here was sweat off some mushrooms in some butter and olive oil then use the barmix to whip them up with a few tablespoons of the mascarpone cheese, salt and pepper.

For the eye fillet however i think it is prudent to show everyone how easy this can be to be done, i am sure lots of people have their methods, but i'm going to describe mine that has time after time delivered juicy tender beef.

I buy my fillet from the butcher and cut it into steaks at home, i like them about 220g or about 2 inches thick, i cut across the grain always and season the raw meat very well with fresh cracked black pepper and sea salt, i heat up some olive oil in a good frypan, and preheat the oven to about 120 degrees, put the meat into the pan once the oil has heated up and turn back the heat a touch so its just below high, i brown the two sides that have been cut first, then brown all other four sides, forget this rumour about only turning a steak once, bbq maybe, but if you have a good cut of meat, it really shouldn't matter, i think what's inportant is to not squash or toss around the meat, treat it with care. Once all sides are well browned, place on a baking tray in the oven and forget about it while you fry off some smashed garlic in the meat pan, deglaze with some red wine, add half a cup of beef stock, a good splash of balsamic vinager and a tablespoon of brown sugar (raw will do also), reduce this to a foamy glaze and turn off the heat, you have a lovely glaze for your steak.

I find the best way to tell when the meat is done is by a combination of factors, most importantly, push down on it with some tongs, it should be firm, but take the pressure easily and spring back, if it is too firm it's starting to get well done, if it takes a while to spring back, it's still underdone. Second factor is if moisture has started to eminate out of the top of the meat, this will tell you that you have a desireable temp within the beef and moisture is starting to boil out of it. Your meat is done to (my) perfection. I fond this process allows you to cook the meat, still rest it and ensure the meat is not burnt onthe outside and raw on the inside.

Andthe picture speaks for itself.

Roast pumpkin & blue cheese ravioli wth sundried tomato pesto


This is what happens when I'm left home alone, i put my thinking cap on, i wanted to make some more ravioli and i wanted a new filing. I'm of the opinion now that i like my ravioli filling to be the main flavour, and for the sauce to accompany it, after some Internet research and having a look in the fridge i decided on the above.

Rather than go through the whole process I'll just write up what I did for the filling and topping, as I have again followed Jamie Oliver's advice on making the pasta and forming the ravioli.

For the filling;
Half a Butternut Pumpkin
clove of garlic (minced)
splash of olive oil

preheat the oven to 180, dice the pumpkin, place in a mixing bowl with the garlic and oil and give it a good toss, you just want a nice thin layer of oil over the pumpkin. Put in the oven until golden and soft. Return the pumpkin to the mixing bowl and add the sliced up blue cheese, start with a bit and gradually mash it into the pumpkin with a fork , making a rough mash, add more blue cheese as you go tasting along the way. I would like to try fetta cheese next time.

For the Pesto;
a good handful of semi dried or soaked sun dried tomatoes
bunch of basil
bunch of parsley
half a handful of pine nuts
handful if shredded Parmesan
two cloves of garlic
half a Spanish onion
red wine vinegar
red wine
tomato paste
olive oil

Now, I used the food processor and pretty much put in a hand full of the herbs each and added more as I felt, but basically everything here needs to be blended, start with small amounts of the red wine and tomato paste, a good dash of red wine vinegar brings this to life and add the Olive oil as you think it needs moisture, after all you're cooking for your tastes, so go wild with what you like.

I boiled a jar and made enough to fill it so i had a jar of my home made pesto in the fridge and keep a heap of dried home made fettuccine in snap lock bags for easy lunches and lazy dinners, a tablespoon of this stuff and some extra Parmesan on top with a glass of Pinot is a nice night in in my books!

Atlantic salmon tossed in angel hair pasta with riccota

This is a great Saturday light lunch, knock it back with a nice rose on the balcony.

This is one of those flash in the pan deals, get everything ready to go, drop your pasta in and its done in literally 5 minutes, the time it takes to cook the pasta.

What i used for two people;

1 fillet of Atlantic/Tassie salmon, skinned, boned, sliced across the grain so you have a hadfull of peices.
Handful of angel hair pasta
Some snow peas (i rip out the string) sliced at angles
one clove of garlic (minced)
splash of white wine
around 100g of ricotta cheese
salt/pepper

Very simple, get your pot of water boiling with some salt and olive oil, get the frypan warm with a dash of oil, once water is boiling, add the pasta and throw the salmon, garlic and snow peas in the frypan, give it a toss until the hot oil has covered everything, add the white wine and simmer off for about a minute, add the ricotta cheese, turn off the heat and swish the pan around to melt/spread the sauce around, strain the pasta, add to the pan and toss it all together, serve with a wedge of lemon and a glass of your summer favourite.

You can also use wilted spinach leaves or green beans as opposed to the snow peas, i have also made this vego by subbing the salmon for cauliflower, just apply heat for a bit longer.

Sorry, no picture for this one, i seem to have lost it, i'll make it again and add it later!

Wednesday, February 11, 2009

Corriander Seed Spiced Ginger Pork Cutlet with Apple and Red Onion jam


I created a new dish tonight that i was pretty stoked with, the pork had a wonderful zesty flavour, slightly salty meat, combined with the sweet yet still savoury jam literally gave me goose bumps, then letting your pallet be refreshed by the sharp, crisp green salad, lots of crunchy fresh vegetables, followed up by the delicious juicy tender pork again. I cant wait to remake this one!

I made up a rub for the pork in my Jamie Oliver Food Smasher, for the rub i used;

half a teaspoon of black peppercorns
one teaspoon of coriander seed
teaspoon of salt
one white section of a spring onion (chopped)
a thumb of ginger root (peeled/sliced)
one small red chili (de-seeded/chopped up)

Smash the dry ingredients first into a powder, you could use a mortar and pestle, then add the ginger, spring onion and chili, smash it all into a paste and rub evenly all over the pork and set aside.

For the salad in the picture, you could do any type of fresh garden salad, i made a Chinese style salad.

Baby Cos hearts
Celery (julienned)
Snow peas (sliced)
spring onion, peeled and sliced
crushed cashews
sesame seeds

I dressed it with some sesame oil and Ketjap Manis.

For the jam, julienne one peeled, cored granny smith apple, and half a red onion. In a pan with about half a cup of balsamic vinegar and a tablespoon of brown sugar, simmer until there is no fluid left, then place in a preheated oven on low heat so the apple continues to soften. This really made the dish.

When BBQing the pork, i use the grill on high, you want to leave about 7 or so minutes each side then turn off the heat and close the hood while you prepare the plates with the salad and get the table set, this will help to rest the meat, ensure its cooked through and let the proteins settle and relax, i find it makes the meat more tender.

Enjoy!!

Saturday, January 31, 2009

Prawn Ravioli with Salsa Verde


After reading some Jamie Oliver books and getting one of Jamie's food smashers i decided to put my thinking cap on and experiment with some pasta, i had made some of Jamie's pasta recipes and used that as a starting point.

I came up with Drunken Prawn, Ricotta and Parmesan for the stuffing, i used Jamie's simple pasta recipe for the ravioli and his Salsa Verde for the dressing.

Rather than plagiarise Jamie's Oliver, I'll just give the reference for the recipes that I've blended and a simple google search should yield the results that you're after.

For the pasta, search for Jamie's quick Pasta. For the making of ravioli, its a simple matter of rolling out some sheets and cutting squares about 10cm x 10cm having a food brush and wetting one side of your squares, placing a dollop of your stuffing in the middle and placing another sheet over the top, the water is your glue and after a solid pinch around the sides you should have your first ravioli!

For the dressing, search for Jamie's Salsa Verde, i searched a few other recipes and i liked Jamie's the best, its got capers and anchovies, and really is damn good, so run with that one, also don't be afraid of anchovies, its used as salt and texture additive, its ground to a paste and is not meant to encourage a fishy flavour. My girlfriend hates anchovies, so i didn't tell her i had added them till after and she loved it.

For the stuffing, being my own creation I'm happy to run through the recipe.

10 large green prawns peeled and de-veined, tails off.
one sprig of basil, mint and parsley, roughly chopped. (same herbs as used in the salsa Verde)
half a cup of white wine
one cup of ricotta cheese
handful of Parmesan, grated.
olive oil.
(should make about 14 raviolis, 4-5 per person is stacks)

All i did here was add some oil to a pan, added the herbs until fragrant, then added the prawns, on a moderate heat, i fried until just opaque and added the white wine, let the alcohol burn off and remove from the heat. I drained the fluid into a mixing bowl and put the prawns onto the chopping board and roughly chopped them up into smallish pieces, i then added them to the fluid in the bowl, added the ricotta and Parmesan, mixed it up and season to taste.
The stuffing should be reasonably flavoursome with the herbs and wine simply complimenting the prawns, the salsa Verde is where you'll get your acidity so don't feel you need to add too much salt or lemon or anything else to the stuffing for extra flavour.

Next time i think I'll try some finley diced Bocconcini and omit the ricotta as this dish is not supposed to be a copybook recipe, just a source of inspiration so you can experiment yourself.

Sunday, January 11, 2009

Smoked Fish

I have wanted to smoke fish for ages now and thought I'd look around the house at what apparatus i could use to DIY a smoker, bingo!!!


My DIY Smoker

I used a cast iron skillet as my base, the surround from a spring form cake tin, an old cake airing rack, and a stainless steel bowl. I got some sawdust from BBQ's galore and i was smoking that afternoon!!

I had caught a Cobia and thought I'd smoke the belly flaps, as they couldn't really be used for a meal as they were smaller than all the other bits.


For smoking fish i read up a bit online and found the consistent thing that everyone does is soak the fillet in a brine solution, i always use a brine solution to clean my fillets as fresh water will significantly dry out the flesh, the rule of thumb i use is to ensure the water tastes as salty as the ocean, then apparently for smoking you add a tablespoon of brown sugar, i gather to combat the highly salty flavour produced from smoking. Soak for at least half an hour.

For the sawdust or smoking chips, these also need to be soaked in water. (apparently you can soak in wine or beer the list is endless depending on what you're smoking) This soaking prevents the smoke from burning out and encourages a nice smoulder.


Soaked sawdust in the skillet

I get the smoke going on the side burner whilst heating up the grill on the bbq for later use, as the lowest setting on the side burner still makes too much smoke at too high a temp so once smouldering, i keep a much steadier temp by moving it onto the grill plate.


Smoking fish (with the lid up for photo)


So once i have a nice smoulder, i place the brine soaked fillet skin down on the rack and cover with the lid, leave for about 20 minutes or i have found that once the fish stops 'sweating' and has a nice golden hue to it, its pretty much done.


Delicious golden smoked Cobia


I decided to crumble this piece into a salad and used a mustard dressing, it was sublime, great lunch or light dinner.

For the dressing;

1 Tablespoon of English mustard
1 teaspoon of balsamic
2 tablespoons of fresh lemon juice
5 tablespoons of good olive oil
salt and pepper to taste.

whisk it all together until it forms a nice smooth consistency

I also used some feta cheese which compliments the smokey flavour of the fish perfectly.


But you can use smoked fish for a bunch of stuff, sandwiches, on some crackers with some cream cheese, salads...


Enjoy!

Wednesday, January 7, 2009

My Hop Garden


I've been growing hops for the last two years now, and this hardy vine only grows in the warmer months, dying off during winter, leaving a rootstock in the ground ready to shoot again once it warms up. Seems this season has been warm enough as its beginning to flower, this should be a decent crop and i should get a few batches of beer out of it, its a Chinook variety so an American Pale ale rich in pasionfruit and citrus aromas will be called for.

Gibbo's Surf and Turf


After a late run of lobsters for my local area (Sutherland Shire) i finally got my hands on a couple and thought why not make a Surf and Turf on Boxing day. And what better turf than some Kangaroo fillet.


Rather than run through the ingredients for everything, I'll just briefly explain the process i use for the various sections of the dish.


This is all about timing and i did all of this dish on the bbq.


For the Roo, have yourself a hot oiled flat plate on the bbq, and simply season your roo fillet with some salt and pepper before it hits the heat. Cook one side until brown then turn, cook the other side untill browned then move to the grill (not on) but leave the plate on low and close the hood, this will gently continue to cook the roo through but leaving it rare and succulent, i usually leave it for about 20 minutes before returning with the lobster.


When i did the lobster for this dish, i used some scissors to cut the membrane that connects the tail to the head, this ensures when you separate, you will pull the meat inside the body cavity also, then i make two cuts on the outsides of the underside of the tail (confused yet?) this allows you to peel back the softer underside of the tail skin revealing the white flesh. Using your fingers, on the hard side of the tail, peel back the meat from the shell, using the scissors to cut around the membranes leaving the tail paddles attached for presentation. I then slice in half (laterally) removing the intestine, rinse in a salt brine and season, this can go on the bbq plate once you believe your roo to be almost done, set aside with the roo on the warm grill plate once it is browned on all sides and the tail flaps are bright red.


For your sides, i use the side burner to boil some sliced potatoes, golden delight seem to crisp up well on the bbq, so peel and slice into 1cm thick circles, boil them in some salted water until lightly blanched, set pot aside until your meats are done, then cook in the hot plate with some olive oil until golden, save the water in the pot also!!


I throw some greens like beans or snow peas onto the hot-plate last, just long enough to get a bit of colour and heat through them.


For the sauces, i used Bearnaise and a red wine/balsamic glaze, Bearnaise I'll save for another day, i cheat and use my food processor and it makes great Bearnaise, google it if you want but I'll do a step by step hassle free Bearnaise soon.

For the glaze, this is real simple, with a small amount of butter and a crushed garlic clove, foam the butter and garlic on the side burner, pour in about 1.5 cups of red wine, and as much balsamic as your palate will handle for acidity, about 150mls of beef stock if you have it (not needed though, but will add some depth, i sometimes add some meat/roo offcuts to the foaming butter for similar effects) and about a tablespoon of brown sugar, salt and pepper to taste and reduce, once boiling add about 3 tablespoons of the potato water, the starches will help any sauce thicken, same goes for any pasta water, i try and save this sauce to the last 5-10 minutes of the dish or until up put the potatoes on the hot plate with some more olive oil. You will know it is done when thick bubbles start foaming, turn the gas off or you'll end up with tar.


Like i said, this sort of cooking is all about timing and starting different processes at the right times will ensure you have juicy meat, succulent lobster and hot ready to pour sauces. (have some warm plates, rinse them in some hot water for a few seconds and dry them off)


Please feel free to ask any questions